Introduction to SSH
SSH stands for Secure Shell and is used to connect to a server to run programs. When you connect, you will be using usually be a command-line based interface to interact with the server. If you aren't familiar with such means of interaction and/or aren't familiar with the Linux operating system, we recommend looking through our Linux tutorial beginning with the Introduction to the command line
Two quick notes related to ssh
- The first time you connect to a seerver, you may see a message about the authenticity of the host. Type
yes(the entire word) to continue connecting. - If you are prompted for a password, when you type your password nothing will display on the screen. There is no problem and the system does know which characters are being typed.
Mac OS X
- Open the terminal application
- If you need to run a graphical application on the server (e.g., Matlab), start XQuartz (Go to Applications > Utilities > XQuartz). This will open a window which just has to be running
- Use the
sshcommand to connect to the serverssh <userName>@<serverName>For examplessh rliu7@rcs-scsn.fandm.edu- In the case where you are running a graphical application, the command changes to
ssh -Y <userName>@<serverName>as inssh -Y rliu7@rcs-scsn.fandm.edu
Windows
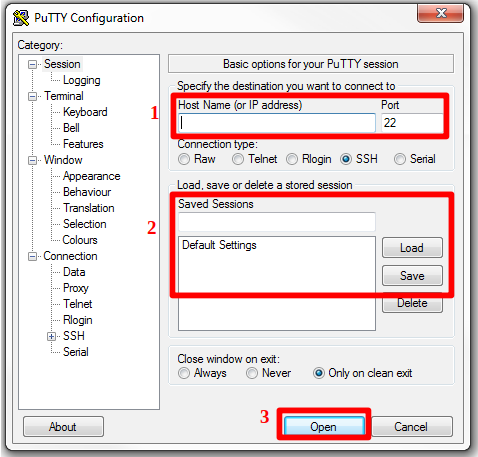
To setup a new connection
- Put
<userName>@<serverName>in the box labelled Host Name (or IP address) (label 1 in the picture below). For example:rliu7@rcs-scsn.fandm.edu - Save the connection for easier access later by entering a name (whatever you want to call it) it in the box labelled Saved Sessions (label 2) and click Save
For sessions that run graphical applications, some adjustments must be made to the configuration:
- Select the session that needs to use graphical applications and click Load
- In the box on the left-hand-side of the window labelled Category: click the following (in order)
- Connection
- SSH
- X11
- Check the box labelled Enable X11 forwarding. At this point, your PuTTY window should look similar to the picture below.
- Go back to the Category: box and click Session. Then click Save to save the new settings.

To actually connect to a server, double click the name of the server in the Saved Sessions box, or single click it and then click Open. If will be using a graphical application, you should start the VcXsrv application before connecting.
There may be times you wish to copy/paste text to/from the PuTTY window. This can be done but doesn't work the way it normally would in Windows. Instructions can be found here on how to do this.